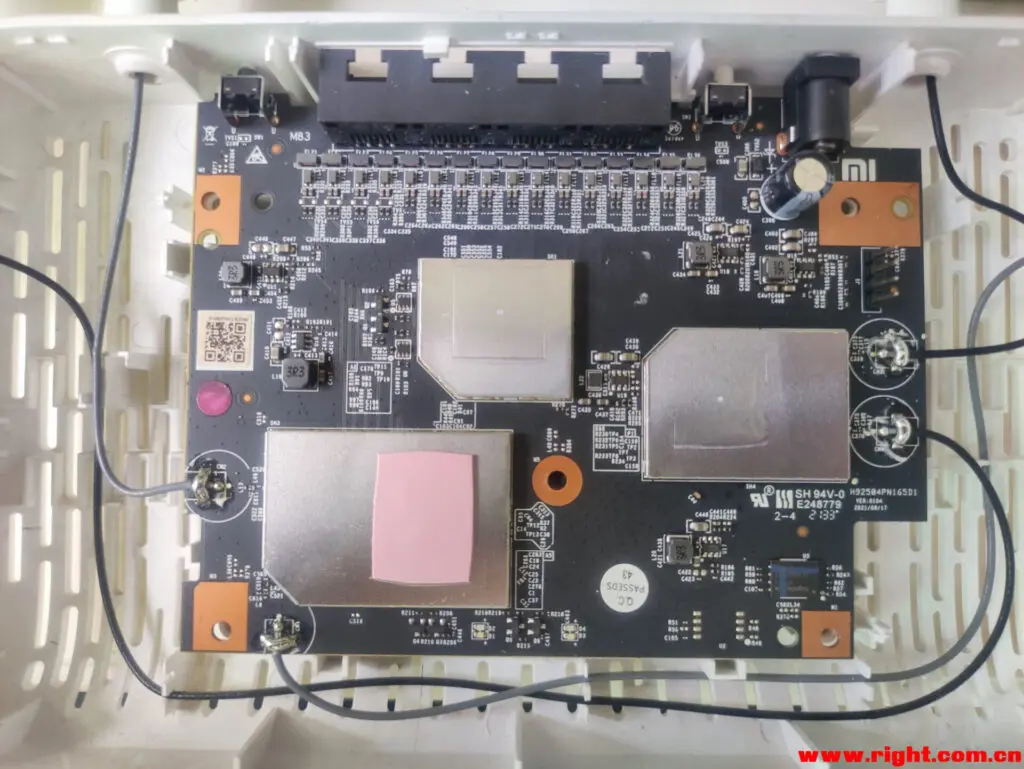
刷机是几个星期前的事了,当时比较忙,没空码帖子,我的CR8808主板编号是M83,自带TTL引脚,工程机???
刷AX3000后,2.4G信号正常,但5G信号极差,估计是5G功放芯片换了。
刷机大概步骤如下:
1、拆机上PL2303HX芯片的TTL线,结果不不跑码,尝试多种方式依旧,无奈重新购买FT232RL芯片的的TTL线,
接线方式是:
RX -> TXD
TX -> RXD
GND -> GND
电源线不用连接
MobaXterm设置如下图

2、路由器通电开机,顺利跑码顺带奇迹出现,未按任何按键既然自动中断AutoBoot!进入U-BOOT(忘记截图了)
3、输入printenv查找确认IP
ipaddr=192.168.10.1 #此为路由器IP
serverip=192.168.10.100 #此为电脑IP
4、开启Tftpd64设置服务器地址为192.168.10.100
5、输入smeminfo 查看分区表
IPQ5018# smeminfo
ubi0: attaching mtd1
ubi0: scanning is finished
ubi0: attached mtd1 (name "mtd=0", size 36 MiB)
ubi0: PEB size: 131072 bytes (128 KiB), LEB size: 126976 bytes
ubi0: min./max. I/O unit sizes: 2048/2048, sub-page size 2048
ubi0: VID header offset: 2048 (aligned 2048), data offset: 4096
ubi0: good PEBs: 288, bad PEBs: 0, corrupted PEBs: 0
ubi0: user volume: 2, internal volumes: 1, max. volumes count: 128
ubi0: max/mean erase counter: 1/0, WL threshold: 4096, image sequence number: 108511920
ubi0: available PEBs: 38, total reserved PEBs: 250, PEBs reserved for bad PEB handling: 40
flash_type:             0xb
flash_index:            0x0
flash_chip_select:      0x0
flash_block_size:       0x20000
flash_density:          0x80000
partition table offset  0x0
No.: Name             Attributes            Start             Size
  0: 0:SBL1           0x0000ffff              0x0          0x80000
  1: 0:MIBIB          0x0000ffff          0x80000          0x80000
  2: 0:BOOTCONFIG     0x0000ffff         0x100000          0x40000
  3: 0:BOOTCONFIG1    0x0000ffff         0x140000          0x40000
  4: 0:QSEE           0x0000ffff         0x280000         0x100000
  5: 0:QSEE_1         0x0000ffff         0x180000         0x100000
  6: 0:DEVCFG         0x0000ffff         0x3c0000          0x40000
  7: 0:DEVCFG_1       0x0000ffff         0x380000          0x40000
  8: 0:CDT            0x0000ffff         0x440000          0x40000
  9: 0:CDT_1          0x0000ffff         0x400000          0x40000
 10: 0:APPSBLENV      0x0000ffff         0x480000          0x80000
 11: 0:APPSBL         0x0000ffff         0x640000         0x140000
 12: 0:APPSBL_1       0x0000ffff         0x500000         0x140000
 13: 0:ART            0x0000ffff         0x780000         0x100000
 14: 0:TRAINING       0x0000ffff         0x880000          0x80000
 15: bdata            0x0000ffff         0x900000          0x80000
 16: crash            0x0000ffff         0x980000          0x80000
 17: crash_log        0x0000ffff         0xa00000          0x80000
 18: rootfs           0x0000ffff         0xa80000        0x2400000
        ubi vol 0 kernel
        ubi vol 1 ubi_rootfs
 19: rootfs_1         0x0000ffff        0x2e80000        0x2400000
 20: overlay          0x0000ffff        0x5280000        0x1f00000
 21: data             0x0000ffff        0x7180000         0xd80000
6、备份出厂固件,逐条输入以下命令,将分区备份到电脑Tftpd64目录下。
nand read 0x44000000 0x0 0x80000
tftpput 0x44000000 0x80000 0SBL1.bin

nand read 0x44000000 0x80000 0x80000
tftpput 0x44000000 0x80000 1MIBIB.bin

nand read 0x44000000 0x100000 0x40000
tftpput 0x44000000 0x40000 2BOOTCONFIG.bin

nand read 0x44000000 0x140000 0x40000
tftpput 0x44000000 0x40000 3BOOTCONFIG1.bin

nand read 0x44000000 0x280000 0x100000
tftpput 0x44000000 0x100000 4QSEE.bin

nand read 0x44000000 0x180000 0x100000
tftpput 0x44000000 0x100000 5QSEE1.bin

nand read 0x44000000 0x3c0000 0x40000
tftpput 0x44000000 0x40000 6DEVCFG.bin

nand read 0x44000000 0x380000 0x40000
tftpput 0x44000000 0x40000 7DEVCFG1.bin

nand read 0x44000000 0x440000 0x40000
tftpput 0x44000000 0x40000 8CDT.bin

nand read 0x44000000 0x400000 0x40000
tftpput 0x44000000 0x40000 9CDT1.bin

nand read 0x44000000 0x480000 0x80000
tftpput 0x44000000 0x80000 10APPSBLENV.bin

nand read 0x44000000 0x640000 0x140000
tftpput 0x44000000 0x140000 11APPSBL.bin

nand read 0x44000000 0x500000 0x140000
tftpput 0x44000000 0x140000 12APPSBL1.bin

nand read 0x44000000 0x780000 0x100000
tftpput 0x44000000 0x100000 13ART.bin

nand read 0x44000000 0x880000 0x80000
tftpput 0x44000000 0x80000 14TRAINING.bin

nand read 0x44000000 0x900000 0x80000
tftpput 0x44000000 0x80000 15bdata.bin

nand read 0x44000000 0x980000 0x80000
tftpput 0x44000000 0x80000 16crash.bin

nand read 0x44000000 0xa00000 0x80000
tftpput 0x44000000 0x80000 17crashlog.bin

nand read 0x44000000 0xa80000 0x2400000
tftpput 0x44000000 0x2400000 18rootfs.bin

nand read 0x44000000 0x2e8000 0x2400000
tftpput 0x44000000 0x2400000 19rootfs1.bin

nand read 0x44000000 0x5280000 0x1f00000
tftpput 0x44000000 0x1f00000 20overlay.bin

nand read 0x44000000 0x7180000 0xd80000
tftpput 0x44000000 0xd80000 21data.bin
7、刷入坛友发的红米AX3000官方APPSBL等分区备份文件,文件需放在Tftpd64目录下,输入以下命令刷入CR8808。
tftpboot OpenWrt.mtd11.bin && flash 0:APPSBL
tftpboot OpenWrt.mtd12.bin && flash 0:APPSBL_1
8、断电,长按reset,用MIWIFIRepairTool刷入红米AX3000_1.0.33固件,待蓝灯闪烁刷机完成,断电拆除TTL线。
9、开机后浏览器输入192.168.31.1进入进入后台,设置测试,结果如开头所说,5G信号极差,失望之极!
10、关机,接上TTL依旧无需任何操作自动进入U-BOOT,重新刷入刚才备份的CR8808原厂APPSBL等分区,命令如下:
tftpboot 11APPSBL.bin && flash 0:APPSBL
tftpboot 12APPSBL1.bin && flash 0:APPSBL_1
11、断电,长按reset,用MIWIFIRepairTool刷入CR8808_6.2.11固件,待蓝灯闪烁刷机完成断电重启。(未拆除TTL线)
12、开机自动进入U-BOOT,输入以下开启SSH及固化命令,会自动重启,拆除TTL,再次重启进入固件。
nvram set ssh_en=1
nvram set telnet_en=1
nvram set uart_en=1
nvram set boot_wait=on
nvram commit
sed -i 's/channel=.*/channel="debug"/g' /etc/init.d/dropbear
/etc/init.d/dropbear restart
mkdir /data/auto_ssh
cd /data/auto_ssh
curl -O https://fastly.jsdelivr.net/gh/lemoeo/AX6S@main/auto_ssh.sh
chmod +x auto_ssh.sh
uci set firewall.auto_ssh=include
uci set firewall.auto_ssh.type='script'
uci set firewall.auto_ssh.path='/data/auto_ssh/auto_ssh.sh'
uci set firewall.auto_ssh.enabled='1'
uci commit firewall
uci set system.@system[0].timezone='CST-8'
uci set system.@system[0].webtimezone='CST-8'
uci set system.@system[0].timezoneindex='2.84'
uci commit
reboot
20230608更新,上面的SSH固化方法在重置后会失效,可以按下面的方法修改Bdata分区数据来进一步固化SSH
在SSH终端执行以下指令:
zz=$(dd if=/dev/zero bs=1 count=2 2>/dev/null) ; printf '\xA5\x5A%c%c' $zz $zz | mtd write - crash
reboot
等待路由器重启后,重新连接ssh,并执行以下指令
nvram set ssh_en=1
nvram set telnet_en=1
nvram set uart_en=1
nvram set boot_wait=on
nvram commit
bdata set ssh_en=1
bdata set telnet_en=1
bdata set uart_en=1
bdata set boot_wait=on
bdata commit
reboot
等待路由器重启后,重新连接ssh,并执行以下指令
mtd erase crash
reboot
13、SSH连接 root@192.168.10.1 (不想计算SSH密码,可直接在U-BOOT修改root密码)
14、在SSH下安装Lcky,安装顺利,但重启后扑街!内存爆了,无限重启!
BusyBox v1.25.1 (2021-09-06 08:28:06 UTC) built-in shell (ash)
-----------------------------------------------------
Welcome to XiaoQiang!
-----------------------------------------------------
$$$$$$\ $$$$$$$\ $$$$$$$$\ $$\ $$\ $$$$$$\ $$\ $$\
$$ __$$\ $$ __$$\ $$ _____| $$ | $$ | $$ __$$\ $$ | $$ |
$$ / $$ |$$ | $$ |$$ | $$ | $$ | $$ / $$ |$$ |$$ /
$$$$$$$$ |$$$$$$$ |$$$$$\ $$ | $$ | $$ | $$ |$$$$$ /
$$ __$$ |$$ __$$< $$ __| $$ | $$ | $$ | $$ |$$ $$<
$$ | $$ |$$ | $$ |$$ | $$ | $$ | $$ | $$ |$$ |\$$\
$$ | $$ |$$ | $$ |$$$$$$$$\ $$$$$$$$$ | $$$$$$ |$$ | \$$\
\__| \__|\__| \__|\________| \_________/ \______/ \__| \__|
root@XiaoQiang:/# passwd root
Changing password for root
New password:
Retype password:
passwd: password for root changed by root
root@XiaoQiang:/# wget -O /tmp/install.sh [url]http://cdn001.gdy666.com/lucky-files/g[/url]
olucky.sh && sh /tmp/install.sh [url]http://cdn001.gdy666.com/lucky-files[/url] 1.8.5
Connecting to cdn001.gdy666.com (172.67.130.244:80)
install.sh 100% |*******************************| 15293 0:00:00 ETA
当前CPU架构:armv7‰
*************************************************
** 欢迎使用 **
* LLcky 管理脚本 *
** by 古大羊 **
*
202njȲ0Dz.Ǫ:ȿ:ń**
************************************************
1 鍛装Lucky
2 䊲Lucky
----------------------------------------------
0ŀ退出脚本
请输入对应数字 > 1
安垳
cky...
目标文件载链接:[url]http://cdn001.gdy6[/url]Ȝᔙ.coшlucky-files/1.ȱȚ.н/cky_1.ȱȚλLinux_armv7.tar.gz
-----------------------------------------------
安装lucky至少需要预留约3MB的랍盘空间
1 /ec目录下安装(适合root用户)
2 在/usr/sare目录下安装(适合Linux设备)
3 在当前用户目录下安装(合非oÔt用户)
4 手动设置安装目录
0 退出安装
----
---Ê-----------------Í-----------------
请输入相应数字 > 1
目标目录/etc空间剩余:204M
确认安装?(1/0) > 1
luckdir:/etc/luckyǎaШM
##########ş/Ş)#>##################################################### 100.0%
------------------------------------ǂ-ǂ%----
开始解压文件!
LICENSE
scripts/lucky.service
sripts/luckyservce
scrits/misnap_init.sh
lucy
已解压到 /etc/lucky.dai
Profile:/etc/profile
设为ini.d方式启动
lu/ky已成功运行
root@XiaoQiang:/#15、无奈!用MIWIFIRepairTool刷入CR8808_6.2.147固件,并再次开启SSH,输入下面命令卸载了Andlink,暂时不想折腾了。
opkg remove andlink-hy - 1.0.0-1虽然CR8808性能和内存确实不足,搞机意义不大,但还是很感谢hzyitc slienna 121716498 NakanoSanku等大佬,开启CR8808搞机之路。
