前面大鸟说过宝塔面板编译添加第三方模块(ngx_http_geoip2)-禁止特定国家IP访问的文章,这种方法可阻止绝大多数来自国外或者代理国外的CC和DDoS攻击。效果还是很不错的,攻击者想要再次攻击成本也增加了不少。
但是,如果对方使用的CDN,比如Cloudflare CDN,那么网站获取到的IP地址都是Cloudflare的CDN节点的,得不到真实用户的IP地址,防御效果大大折扣。好在Cloudflare已经为我们想到这一点了,将访问者的 IP 地址包含在 X-Forwarded-For 标头和 CF-Connecting-IP 标头。
但是使用之前我们需要编译ngx_http_realip_module ,realip模块的作用是:当本机的nginx处于一个反向代理的后端时获取到真实的用户IP。
如果没有realip模块,nginx的access_log里记录的IP会是反向代理服务器的IP,PHP中$_SERVER[‘REMOTE_ADDR’]的值也是反向代理的IP。而安装了realip模块,并且配置正确,就可以让nginx日志和php的REMOTE_ADDR都变成真实的用户IP,从而达到防御的目的。
这篇文章我们还是以宝塔面板为例,说说如何编译ngx_http_realip_module,以及通过对nginx配置,获取到真实的IP。
一:ngx_http_realip_module编译
ngx_http_realip_module 模块用于改变客户端地址和可选端口在发送的头字段里。默认情况下是不被编译,应使用 --with-http_realip_module 配置参数启用它:
宝塔面板编译大鸟就简单说说了,比较简单,如果不会可以看看大鸟前面的文章:
1.1直接编辑nginx.sh文件,路径:/www/server/panel/install
在你需要安装的Nginx版本下增加:–with-http_realip_module,目的是为了保持原来的配置不变同时又增加新的模块。可以如大鸟这样增加,也可以放在最后面,如图:
1.2编译nginx
重新编译Nginx,我们需要选择好自己的版本,大鸟的是Nginx1.15.8。命令如下:
sh /www/server/panel/install/nginx.sh install 1.15
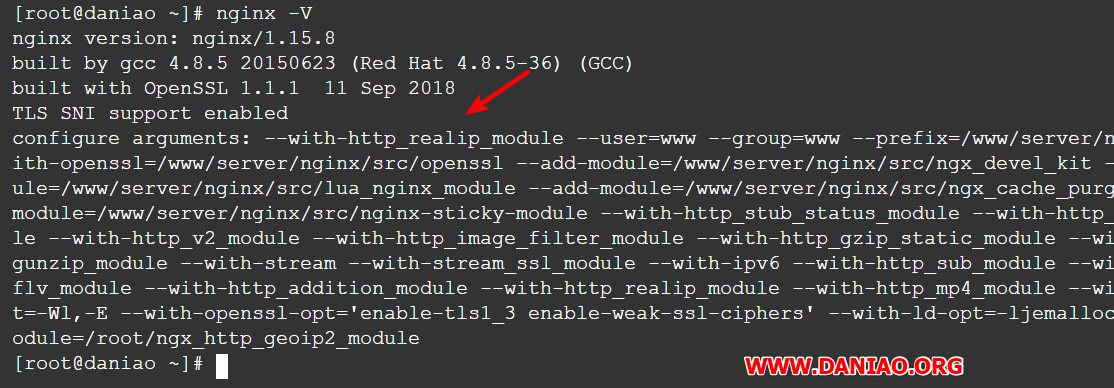
安静等待编译完成。完成之后,用nginx -V来检查是否成功。
我们看到已经编译好了ngx_http_realip_module模块。
二:设置set_real_ip_from
编译好了ngx_http_realip_module,现在我们只需要在Nginx配置文件中添加set_real_ip_from代码,示例如下:
set_real_ip_from 111.111.111.111;  #这里是需要填写具体的CDN服务器IP地址,可添加多个
set_real_ip_from 222.222.111.111;
real_ip_header  X-Forwarded-For;
real_ip_recursive on;
如果你用的是CloudFlare免费CDN,请将以下代码加入到你的Nginx配置文件当中。
location / {
 set_real_ip_from 103.21.244.0/22;
 set_real_ip_from 103.22.200.0/22;
 set_real_ip_from 103.31.4.0/22;
 set_real_ip_from 104.16.0.0/12;
 set_real_ip_from 108.162.192.0/18;
 set_real_ip_from 131.0.72.0/22;
 set_real_ip_from 141.101.64.0/18;
 set_real_ip_from 162.158.0.0/15;
 set_real_ip_from 172.64.0.0/13;
 set_real_ip_from 173.245.48.0/20;
 set_real_ip_from 188.114.96.0/20;
 set_real_ip_from 190.93.240.0/20;
 set_real_ip_from 197.234.240.0/22;
 set_real_ip_from 198.41.128.0/17;
 set_real_ip_from 199.27.128.0/21;
 set_real_ip_from 2400:cb00::/32;
 set_real_ip_from 2606:4700::/32;
 set_real_ip_from 2803:f800::/32;
 set_real_ip_from 2405:b500::/32;
 set_real_ip_from 2405:8100::/32;
 set_real_ip_from 2c0f:f248::/32;
 set_real_ip_from 2a06:98c0::/29;
 # use any of the following two
 real_ip_header CF-Connecting-IP;
 #real_ip_header X-Forwarded-For;
 }
#不要忘记重启nginx
service nginx restart
如果不知道放哪里看图:
一般来说CloudFlare的IP地址是不会变的,你可以在这里找到:https://www.cloudflare.com/ips/,但是为了以防万一!
三:仅允许Cloudflare CDN的IP访问
上面我们是通过安装ngx_http_realip_module模块获取到了用户真实的IP地址,但是有的时候我们需要借助Cloudflare 的安全防护功能来防止CC或者DDoS攻击,即仅允许Cloudflare CDN的IP访问我们的访问。
Nginx直接拒绝和允许IP访问代码示例如下:
location / {
    deny  192.168.1.1;
    allow 192.168.1.0/24;
    allow 10.1.1.0/16;
    allow 2001:0db8::/32;
    #Railgun IP
    deny  all;
}
如果我们仅允许Cloudflare CDN的IP访问网站,我们可以直接在nginx配置中将Cloudflare CDN的IP添加到允许的范围内。
#直接加入
# https://www.cloudflare.com/ips
# IPv4
allow 103.21.244.0/22;
allow 103.22.200.0/22;
allow 103.31.4.0/22;
allow 104.16.0.0/12;
allow 108.162.192.0/18;
allow 131.0.72.0/22;
allow 141.101.64.0/18;
allow 162.158.0.0/15;
allow 172.64.0.0/13;
allow 173.245.48.0/20;
allow 188.114.96.0/20;
allow 190.93.240.0/20;
allow 197.234.240.0/22;
allow 198.41.128.0/17;
# IPv6
allow 2400:cb00::/32;
allow 2405:8100::/32;
allow 2405:b500::/32;
allow 2606:4700::/32;
allow 2803:f800::/32;
allow 2c0f:f248::/32;
allow 2a06:98c0::/29;
如果你启用了Cloudflare Railgun动态加速,记得将Railgun的服务器IP加入到配置当中,因为启用了Railgun后网站获取到的IP地址都来自Railgun服务器上的。
四:总结
set_real_ip_from指令是告诉nginx,10.10.10.10是我们的反代服务器,不是真实的用户IP,real_ip_header则是告诉nginx真正的用户IP是存在X-Forwarded-For请求头中(对X-Forwarded-For不了解的同学请自行百度)。
重新加载nginx配置之后,就可以看到nginx日志里记录的IP就是真实的ip了,在使用了CDN加速后,我们的网站获取到的用户IP变成了CDN的IP了,想要获取到用户的真实IP就得利用Nginx的realip模块。就是基于这个原理。当然,如果你用的CMS是php程序如:Wordpress,直接将以下代码加入到你的Wordpress配置文件当中即可。
if(isset($_SERVER['HTTP_X_FORWARDED_FOR']))
{
$list = explode(‘,’,$_SERVER['HTTP_X_FORWARDED_FOR']);
$_SERVER['REMOTE_ADDR'] = $list[0];
}
当然了,即使觉得wordpress配置简单,我们也要先编译ngx_http_realip_module模块,才可以使用。


